Running GLM

Running GLM (Suggested Method)
Install Visual Studio Code
Visual Studio Code (VSC) is a convenient tool for editing and running GLM in an integrated environment. Begin by downloading VSC here.
Open the WarmLake Directory in VSC
Launch VSC and click the Explorer button then Open Folder. Next, navigate to the WarmLake directory and click Open.
Enable Syntax Highlighting and Open a .nml File
GLM’s WarmLake simulation can be configured by editing it’s .nml text files in VSC. For better legibility when editing a .nml, enable Fortran syntax highlighting. Click on the Extensions button and search for the Fortran extension to install. Once installed, click on the Explorer button again and open the glm3.nml file. In the bottom right-hand corner, click on Plain Text and search for Fortran - Modern.
Run GLM
To launch GLM, first open a new terminal session from VSC’s menu bar. Depending on your operating system, the commands to run the simulation will differ:
MacOS/Linux
Begin by typing
sh run_glm.shinto the terminal prompt.You’ll then be prompted to select which GLM plotting script will be used to visualise the model’s outputs as it runs. Enter
1and the simulation will launch with the basic visualisation configuration (temperature and salinity).
chmod +x run_glm.sh once in the terminal to enable executable permissions for the shell script that launches GLM. After running sh run_glm.sh, your Mac may block opening GLM for the first time. If this occurs, go to your Security options inside System Preferences and click ‘Open Anyway’. Then re-run sh run_glm.sh in VSC’s terminal.
- Once the simulation has finished, click Done and return to the terminal to either re-run the model or quit (option
4).
Windows
Open a new terminal.
Next, run the GLM script by entering
.\run_glm.batinto the terminal prompt.Once the simulation has finished, click Done and return to the terminal to either re-run the model or quit.
Running GLM (Alternative Method)
The model can also be run on Mac or Windows without the Visual Studio Code, based on the following instructions.
Running GLM on MacOS
- Open the Terminal application on your Mac
- Use the
cd(change directory) command to navigate to the simulation directory (e.g. the WarmLake folder) - In Finder, go to the
GLM/macfolder and right-click on the glm app, select Show Package Contents - Enter the Contents folder then the MacOS folder, and locate the glm executable file
- Back in terminal, enter the file path for this executable file - you can do this by dragging/dropping the file into the terminal
- Leave a space after the file path and type
--xdisp - Press
Enterand the model will run
These steps are shown in the screen recording below for an example simulation:
Running GLM on Windows
On Windows, the model can be run using a batch-file glm.bat, which you can open from in the simulation directory (e.g. Kinneret97 folder). The .bat file calls the GLM model from the current working directory, and should be located where the `glm.nml’ file is.
..\GLM\win\glm_3.3.0\glm.exe --xdisp
echo press any key
pause
If the model is not opening make sure that you are not working from a network directory (e.g. OneDrive) and the file path to the run_glm.bat file has zero spaces in it.
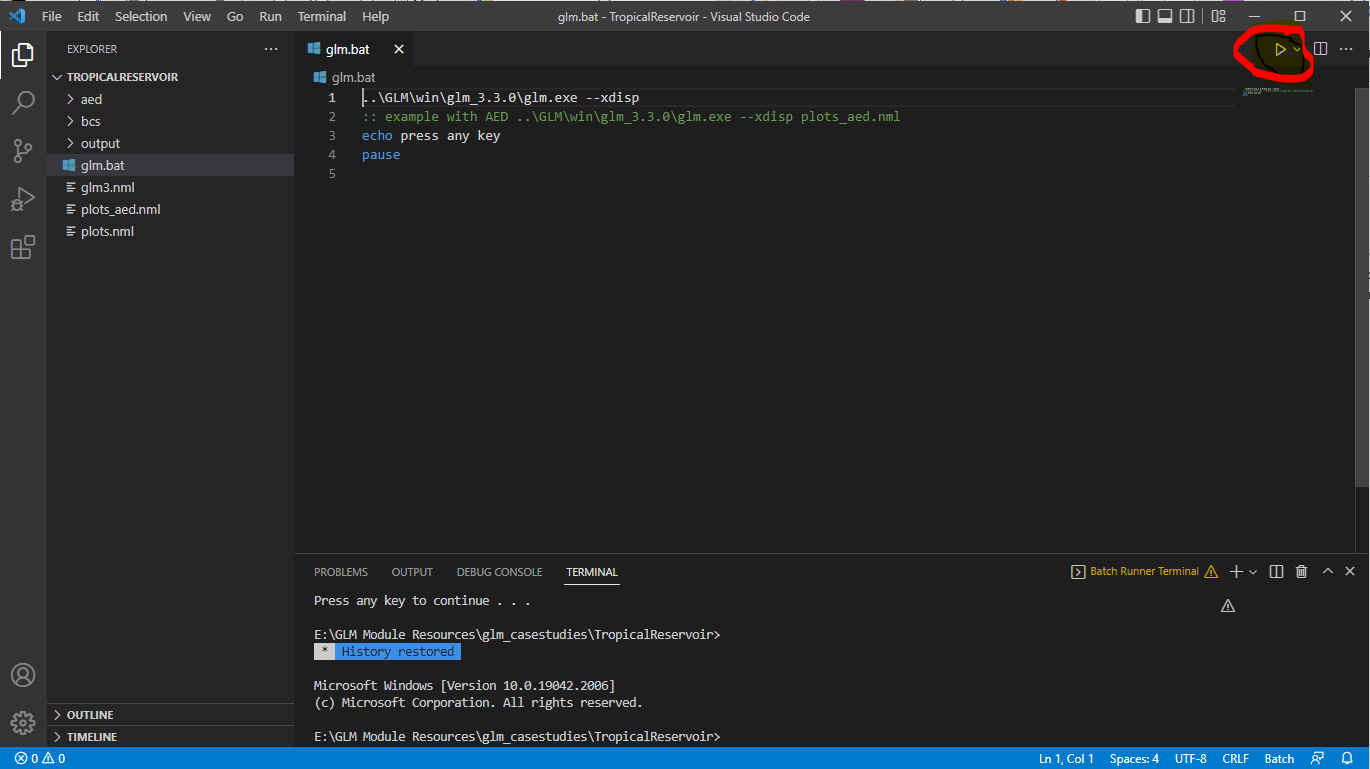
Running and editing GLM with Visual Studio Code Batch Runner extenstion on windows
- Click ‘Extensions’ on left panel, search ‘Batch Runner’
- Install the Batch Runner extenstion
- Open the GLM case study folder (e.g. TropicalReservoir) by clicking
File–>Open Folder - open the
run_glm.batbatch-file, click the Run symbol (see figure below) to run GLM - Open the
glm3.nmlby clicking the file name on the left file list panel, for viewing and editing the GLM configuration file - You can now edit the glm3.nml file to change your configurations and run GLM in a same environment to see the changes in the outputs
If you are new to Visual Studio Code and the software is being run for the first time, you can install the NewGRF Meta Language extension for better visualising and editing nml files.
Running GLM in Python with glm-py
glm-py is Python API for GLM. You can use it to configure, run, and visualise GLM simulations in just a few lines of code. If you already have a Python installation on your computer, you can install glm-py with pip:
pip install glm-pyFor users new to Python, it is recommended that you first complete the Bonus Exercise before installing Python and glm-py on your computer. You will use a browser-based Python notebook that won’t require installing any software on your computer.
Visualising Results
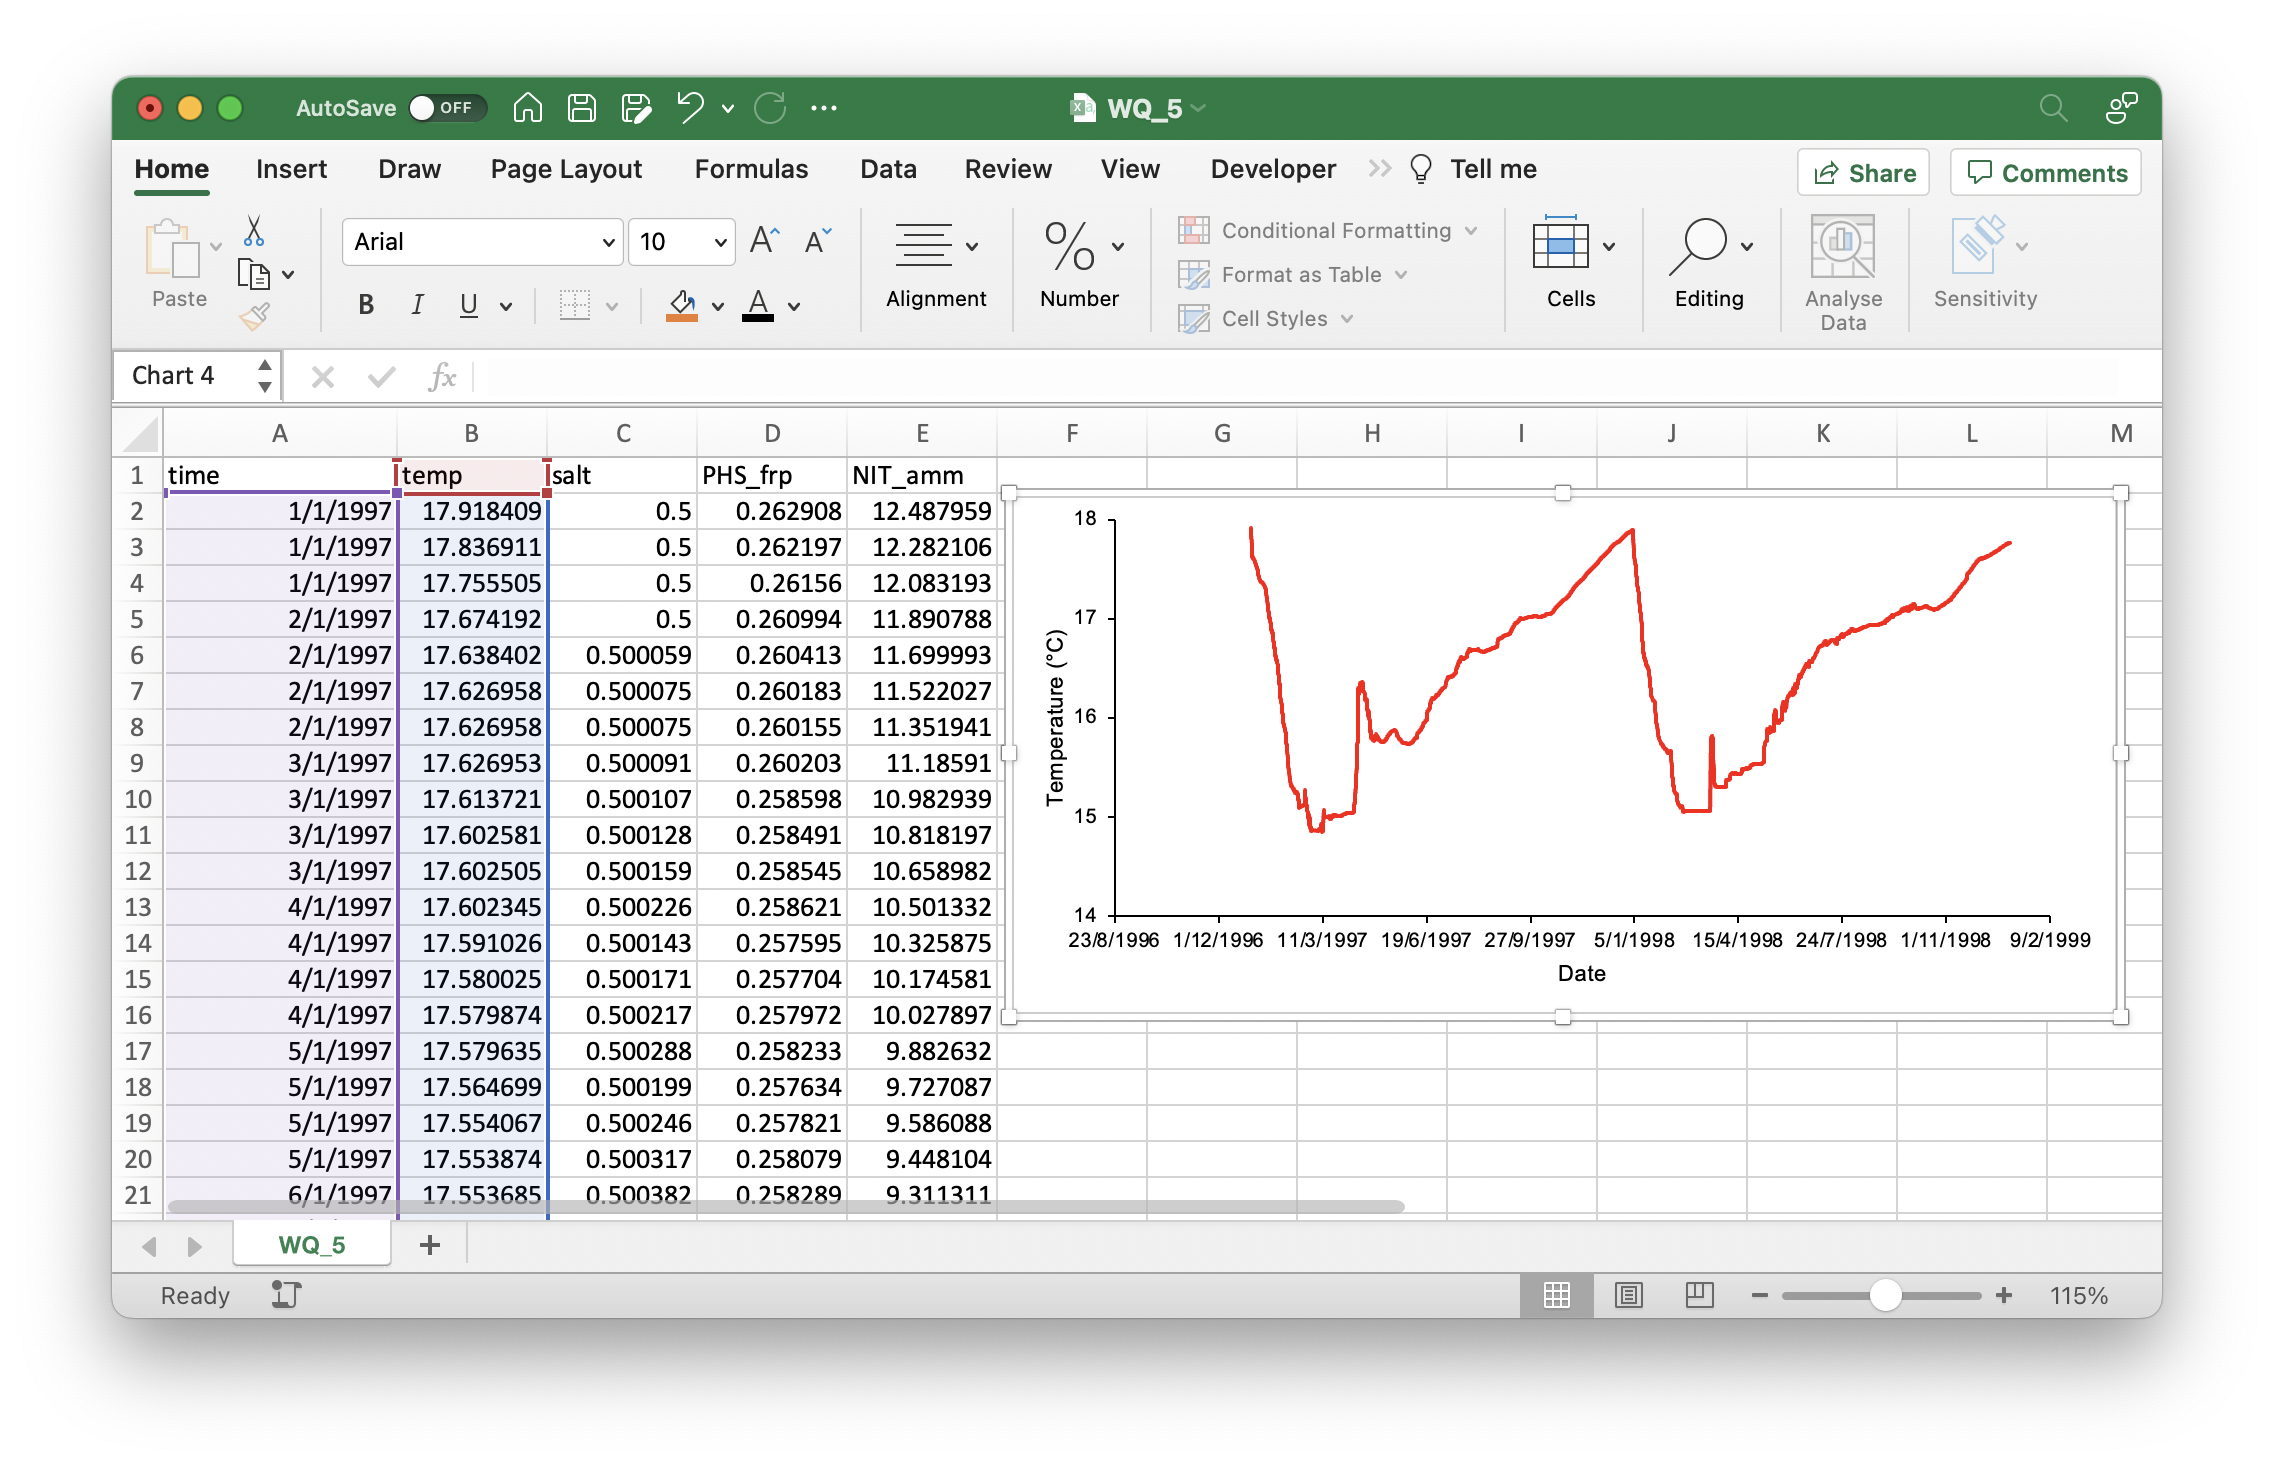
Depending on your preference for visualisation software, both Excel and R can be used for the plotting of GLM’s general lake or depth-specific csv outputs. R is required for visualising NetCDF outputs.
R
# Load packages
library(tidyverse)
library(lubridate)
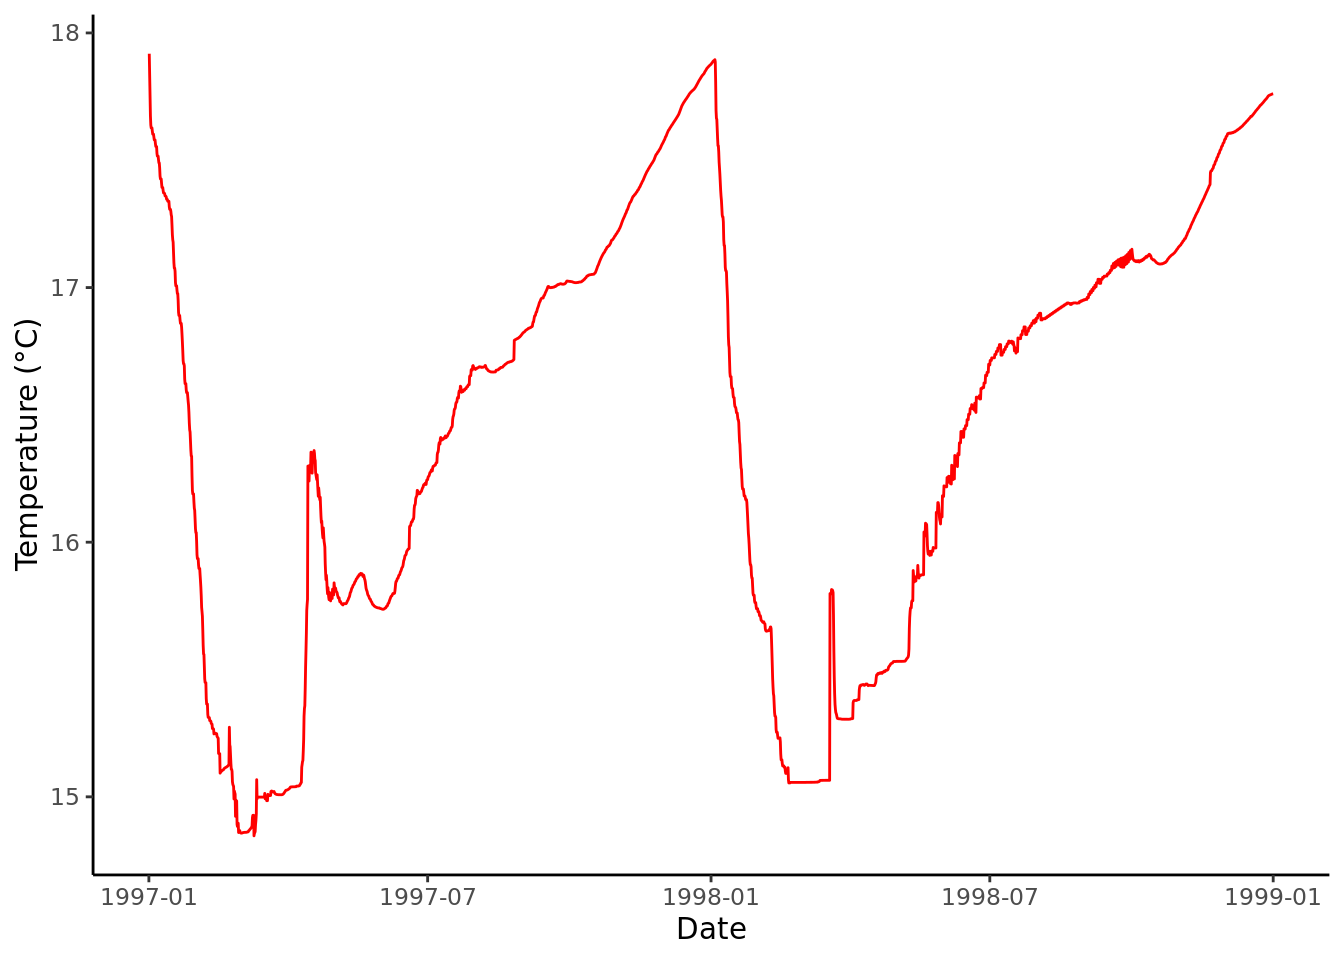
read_csv("plots/processing-outputs/WQ_5.csv") %>% # Read GLM csv
mutate(
time = as_datetime(time, format = "%Y-%m-%d %H:%M:%S") # Format date/time
) %>%
ggplot(mapping = aes(x = time, y = temp)) + # Plot with ggplot()
geom_line(colour = 'red') +
labs(x = "Date", y = "Temperature (°C)") +
theme_classic()